We all know that we literally owe plants our lives, but for those of us living and working in confined spaces, our relationship with these oxygen providers can often be a distant one.
We admire the trees in the local park or sit under them for a few cheeky bevs of an arvo. Some of us might even sneak a few leaves or flowers from a neighbor’s house, hoping against hope that the stale air of the apartment we share with three strangers and a dog won’t cause them to wither and die. Others choose to surround themselves with fake plants, filling their concrete caves with the appearance of greenery but gaining none of the life force of the real thing.
No matter which of these groups you belong to, we have good news for you. It doesn’t have to be this way and with the help of CANNA and this handy guide to gardening in tight spaces, in just a few short steps, it won’t be. Whether you’re an apartment dweller, a sharehouse liver, a time-poor professional or just a self-diagnosed plant killer, we’ll take you from novice to green thumb in record time, giving you the power to bring those greenery-filled fantasies to life.
All it takes is a little DIY energy and know-how.
Step 1: Inspiration
Before we do anything in life we must ask ourselves one question: Why?
When it comes to starting a garden in your home the answers are plentiful, but here’s a handy list to inspire you to action.
Health Benefits: Plants produce oxygen and remove carbon dioxide, but in news that’ll delight stuffy concrete jungle dwellers, some plants also purify the air! It’s true, from Chrysanthemums to Spider Plants, Peace Lilies to Philodendrons, there’s a laundry list of low-maintenance, space-conscious plants that can remove toxins from the air you live in, work in, play and sleep in. That’s right, from ammonia to formaldehyde and so many nasties in-between, your garden will fast become the only line of defense you need.
Growing Your Own Food: We all know that fresh, organic food tastes better and is better for us. But you don’t have to move to a farm, drive to the country or go to super expensive grocers to experience the benefits of fresh, home-grown food. A surprising number of fruits, vegetables, and herbs can be grown in confined spaces. Including your soon-to-be new garden. From salad standards like tomatoes, rocket and lettuce to spicy chilies and succulent strawberries, there are so many delicious foods that you can grow for yourself with little space and relative ease. Heck, you could even grow your own Echinacea, Chamomile, and Aloe Vera and start your own DIY skincare routine, too!
Contribute to Carbon Reduction: Plants suck up carbon. By planting more plants, you reduce carbon. That’s right, by planting a garden at home you not only clean the air you breathe in, but you’ll reduce your carbon footprint as well.
Step 2: Location
No matter how small your space is, having some form of garden or greenery is absolutely attainable, but in order to succeed you’ll obviously need to know how much space you have and which types of plants will be suitable to fill that space and achieve your green dreams.
Indoors: The good thing about plants is they can grow pretty much anywhere, so if your only option is to plant inside, there’s plenty of good ways to do that. Plants for the most part can be grown in pretty much any size container. So as long as you’ve got some pots handy, you can start your garden on windowsills, shelving, hanging planters, the ceiling, or — depending on access to sunlight and how clumsy you are when you’re drunk — the floor.
Outdoors: Even the smallest outdoor space, like an apartment balcony, pathway, dog run, or communal space (if permitted) can make for a great outdoor garden so use your imagination. As long as there is sunlight, air, and tender loving care, it’ll grow there.
Once you know where you’re going to be planting your garden, start researching what grows best in that space or give your local nursery a ring, they’ll typically be more than happy to help answer your questions and suggest plants to get you started.
Step 3: Planning
The best gardens are planned gardens but don’t stress, you don’t need to contact a landscaper, there are just a few things that you need to consider before you start planting that’ll increase your chances of success.
Sunlight: Fruiting and flowering plants need between six to eight hours of direct sunlight each day. This can obviously present a challenge for people planting indoors, but chances are that even moving all of your plants up onto the windowsill will help. If it’s an extra dark place with no outdoor access, then you can add a grow lamp that simulates the sun’s rays or you can switch up the types of plants you grow. There are six levels of sunlight in gardening, so consult the internet or your local nursery for specific solutions for your space’s challenges.
Water: Plants that are being grown in containers and pots need a lot of water compared to their free growing friends. So it is important to make sure that wherever you are planting there is easy and plentiful access to water. The windowsills in the kitchen and bathrooms are a popular spot for a reason, the sink is right there. If that’s not an option, just make sure you’re hyper-aware that your plants need a drink just as much as you do, so plan out the when and how you are going to give them one. Also don’t forget to keep a spray bottle handy to give them a little spritz here and there, especially in dry areas, plants need humidity to live.
Soil: The type of soil that you use when planting your garden is imperative to its chances of success. You can’t simply use normal garden soil, you need to use specialty potting mix. Thankfully that’s where CANNA comes in. They offer a full range of gardening products that provide all of the nutrients needed to grow fast, healthy, beautiful plants.
Wind: If you are planting outside, take notice of how windy it gets and if it gets above a breeze, it might be worth making sure that your plants are protected by something to block it out. This way, you’ll save your plants from tearing or falling over.
Step 4: Actualization
Now that you’ve decided that you want to start your own garden and have planned out where it is going to be and the types of plants you’ll be growing, it’s time to do the actual planting!
Getting the Plants: You can get most of the plants that you’ll require for your new confined space-friendly garden at pretty much any local nursery or market, but if that’s not an option, then most major hardware stores and retailers stock most of what you need to get started. Before you spend a cent, though, please consider that there’s also the option of asking for seedlings from friends and neighbors. Plants don’t care about the exchange of money. All they care about is clean water, soil, and air so the free ones will grow just as well as purchased ones.
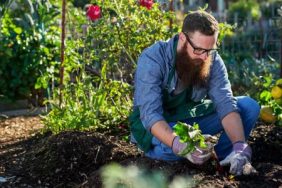
Planting the Plants: Many plants you’ll buy will come pre-potted, so all you need to do is put them in place and remember to give them sunlight and water and turn the soil, but for those going the fully DIY approach, you’ll need to make sure you have an appropriate amount of appropriately sized containers, a little shovel, access to water and some gardening gloves.
Most seedling packets will contain instructions and, again, friends, nursery staff and even the Internet will be able to help you out. If you live in a shared house, it can be fun to do all the planting in one day then watch the plants’ growth together as a group.
Step 5: Maintenance
Now you have your very own garden, you’ll need to do a few things to keep it growing, so remember to do these four things to ensure the garden continues to thrive.
Water: The soil in pots and containers will dry out quite quickly, especially during growth stages, so be sure to check the soil daily by poking your finger five centimeters below the surface. Hang onto the little index card that comes with your plant so you know how much water it likes. If it feels dry, give the little plant some water!
Feeding: The soil or potting mix you plant it with won’t last forever so be sure to top-up your CANNA products in accordance with the instructions.
Defense: Diseases and pests seem to always find a way to get to plants, but they don’t have to be the death of them. Inspect your plants when you are watering or feeding them and if you spot any signs of trouble, such as discolored leaves or half-eaten leaves, then move that plant far away from its friends, if possible, and consult your nursery or another green thumb on how to solve the problem.
Harvesting: If you’ve chosen to grow food, then it is important to know when it is the right time to harvest and enjoy. Not only will you benefit from eating it at the tastiest time, but the plant will benefit, too, because harvesting often encourages accelerated growth, especially when using products like CANNA, meaning more food for you, more often!